 For a movie maker on a budget, or a cinematographer who is looking for a mobile calera, there are two main classes of cameras vying for a spot. This debate is quite worn, as mirrorless cameras really shook up the market when they were first introduced. However, there are two main ways to approach this topic, from a movie maker’s point of view, or a photographer’s point of view. This article will cover this debate from a cinematographer's point of view. First of all, here are some basics:
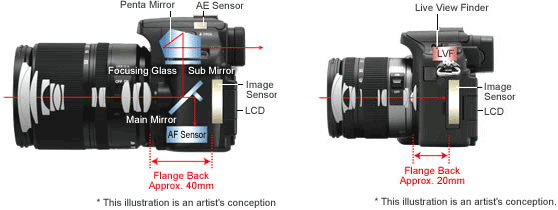
A DSLR (Digital Single Lens Reflex) camera has a mirror behind the lens which reflects the light into the top of the camera into another mirror which reflects that light into the VF (View Finder). This allows the viewfinder to be the most accurate, as it is simply using the same light that the image sensor would receive. When the shutter button is pressed, the mirror will flip, exposing the image sensor to the light. The nature of this design forces the DSLR body to be bulky, as there is space needed to house the slanted mirror. A mirrorless camera, as the name suggests, does not have a mirror to reflect the light. Obviously, this is a blessing and a curse. A Mirrorless camera can be much less bulky, however, the VF will have to display a picture via other means. Therefore, most mirrorless cameras have an EVF “Electronic Viewfinder” which is essentially a 0.5 inch high resolution screen that takes a digital image from the sensor and displays it. While most EVFs are pretty accurate, you still lose some accuracy. Also, most mirrorless cameras can record much higher resolution video, (UHD or 4K, or 1080p at 120/240 FPS). Now, for a long time, cinematographers had to either use a DSLR or a video camera. DSLRs had superior low light performance, and were able to create a deeper depth of field, while video cameras had better ergonomics for handheld shooting and higher resolution video capture. However, Mirrorless cameras handily beat DSLRs for cinematography, for the simple reason that they can record at much higher resolutions and bitrate. For example, a $600 Mirrorless camera, the Panasonic G7 can record at 4K (capped at 20 minutes). However, only top of the line Nikon DSLRs can do 4K, the Nikon D5 and the Nikon D500, which clock in at $5,000 and $2,000 respectively. However, some mirrorless cameras have overheating issues, since their small camera bodies do not dissipate heat as easily as their larger counterparts, the the Sony A6300. Overall, though, mirrorless cameras handily beat DSLRs in the cinematography department, as the aforementioned Sony A6300 clocks in at a grand and boasts 4K, an APSC Sensor, and 1080p at 120fps. If you are in the market for a new camera that is more focused on shooting video, at least for today, mirrorless cameras are the way to go.
0 Comments
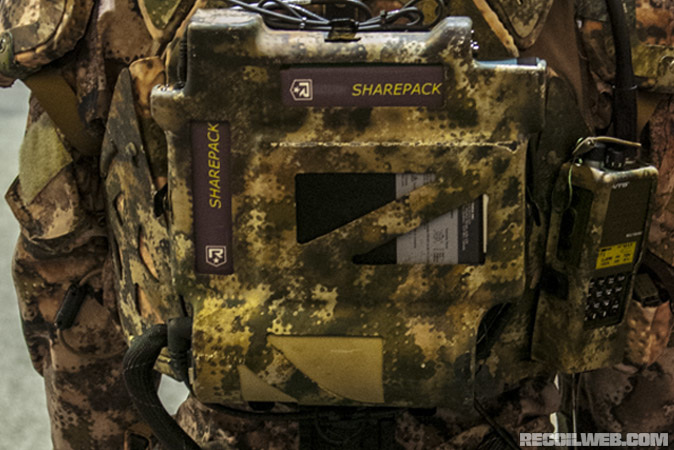
 Since the beginning of warfare, humans have tried to experiment with personal protection, trying to minimize casualties. During the medieval era, knights wore heavy, unwieldy full steel armor that provides fantastic protection with the expense of mobility. Armor went away during the invention with gunpowder, and it wasn’t until recently that the technology was realized to provide effective ballistic protection. However complaints still remained, mostly because of the weight. Most militaries sought to outfit their soldiers with maximum protection, that protected against rifle plates. After anti insurgency became the norm, there was a push to outfit the troops with maximum coverage Armor Carriers, to protect against shrapnel. However, the added protection was useless against rifle threats. Furthermore, adding the extra soft armor added weight, (10-15) extra pounds, and made it much hotter for the troops. Many troops viewed the extra armor as uncomfortable, and even a liability, since the lack of extra rifle protection and the lessening of mobility. While the 30 pound vest might not usually be a problem, at least for paramilitary forces like SWAT, patrolling in Afghanistan, which is hot, and 10,000 feet above sea level, heavy armor severely impeded troops. To counteract this, DARPA has launched research programs into exoskeletons which help bear weight for troops. However, first exoskeleton designs, which helped bear a lot of weight, were heavy (sometimes weighing up to 100 pounds), lacked sufficient power supplies, and were way to bulky. The two main competitors were the Sarcos/Raytheon XOS 2 and the Lockheed Martin HULC. However, the Hulc was found to be too bulky, and therefore useless in a firefight. Recently though, a new competitor has emerged on the scene, and this was the Revision/B-Temia PROWLER, and when compared to other exoskeletons, it was less bulky, even though it could carry less weight. Now, Revision has seemed to have integrated armor into the exoskeleton, revealing the “Kinetic Operations Suite” as their entry into the SOCOM TALOS (Tactical Assault Light Operator Suit) project. Capabilities Revision boasts that the suit incorporates much more rifle defeating armor than current plate carriers (from 18% to 60%), a 6 hour battery, and cooling system. Now, obviously, the armor is designed for DAs (Direct Actions), where the entirety of the mission would be measured in a couple of hours, so the battery should be no issue. However, it would not last for long patrols of many days. The helmet seems to be a modified of version of Revision's commercially available Viper Batlskin mandible protector. This will give an operator some facial protection against fragmentation and handgun rounds, but will do nothing to stop rifle rounds. Also, the operator will not be able to obtain a cheek weld, so a modified way to sight down the weapon will be required. To be honest, a more ergonomic choice of mandible protector like a Mtek or Ops-Core Gunsight mandible might have been a better choice. Also, this version is sporting the GPNVG-18, useless during the day, so this seems like a night variant. There is a system to bear the weight of the helmet. Going down to the chest area, we can see some sort of plate carrier, curiously having MOLLE straps absent. This is an odd choice, since this suit seems to be looking for maximum protection, and plate carriers lack the soft armor to provide the extra fragmentation protection. Also, plate carriers lack side plates. I would honestly expect to see an Armor carrier like the Improved Outer Tactical Vest here. Going to the back, we see the battery pack. Going down to the legs, we see some sort of armor. Given that they advertise 60% rifle defeating plate protection, this leg armor must be at least NIJ Level III rated, given that there is no armor on the arms. We can also see the exoskeleton. This is the only view we have gotton of the Kinetic Operations Suite, and the concept is impressive, however, there are a few issues that must be worked out before this design is fielded.
 This is the second part of my Arma III cinematic guide. This part will detail scripting and filming shots while you create your Arma III cinematic. After you’ve finished brainstorming and scripting your machinima, it is finally time to get your shots. Machinimas stand out because of their unique camera angles, shots, or compelling story. Since I was personally making a trailer, there wasn’t much room for a compelling story, so I would have to stick with unique shots. Arma 3’s Eden Editor is incredibly powerful and is easier to use than most Game Map creators. However, there is still a significant learning curve. Here are a couple of steps to plan out a good shot.
Environment: Where is your shot taking place? What kind of atmosphere do you want? For example, for one of my first shots, I wanted a scene of a couple of T-90 russian tanks rampaging over a war torn Estonia. By using the Community Upgrade Project, I used Cheranus to substitute as Estonia. I chose a small, rural town, and by clicking “Intel” on the top bar of the editor, I changed the time to 8 AM and made the weather overcast. I also added a bit of fog to create the suitable gloomy look. Furthermore, to make the setting as “war torn’ as possible, I added a couple of props that were wrecked vehicles. However, the looked incredibly strange since, without a fire, they looked like they had been abandoned for 20 years and nothing violent had happened. This began my journey into scripting. Simply, Arma III doesn’t have any way to place a fire, whether it be on a building or at a car. Therefore, I had to edit the unite (init) code after double clicking on the wreck, and I inserted a bit of code I found on the internet. Sequence of Events After you have scripted your scene, you should have a good idea of what your scene should entail. Decide on a mood and tone. For example, since I was creating a defeat scene, where the local militia were being overrun by the technologically superior Russians using T-90s, so I added a team of 6 T-90s, which had a waypoint in the middle of the village they were supposed to take. To make sure they actually used the road, I double clicked the waypoint, and set behavior to safe. Now to add some helpless militia, I used one of my modded units that was called “militia”. They were poorly equipped with civilian clothes and a outdated Mosin-Nagant rifle. I also ran into some trouble, since these were spawned under the “opfor” faction, and the T-90s were also spawned under “opfor”, they would not attack each other. I therefore circumvented this by spawning a blufor character, setting the rank to colonel, changing its possibility of appearance to 0, then grouping the militiamen to that blufor soldier. Obviously, the militiamen stood no chance against the T-90s, but then Arma III’s wonky AI came into play. The militiamen wouldn’t even shoot their rifles, they would just run around and then get mercilessly gunned down by the T-90. Therefore, to make it more interesting, I changed the loadout on one of the militiamen to add an RPG. Next week, I'll add more information about production and editing. Recently, the police forces of the United States have gotten a lot of flack for the deployment of “paramilitary” forces, also known as SWAT (Special Weapons and Tactics), as many opponents believe that the police are becoming too “militarized”. This is true to some extent, as SWAT is equipped with rifle defeating armor and carbines. However, there are many important distinctions between paramilitary forces like SWAT, and the United States Military.
First of all, there is an important change of doctrine and mindset. This can be shown even by the difference by equipment, more specifically the body armor. As I have written about before, military body armor is usually lightweight, only covering vital organs to cut down on weight. Since servicemembers usually embark on long patrols on rocky terrain, weight is a primary concern. However, they sacrifice fragmentation and pistol protection on their sides. As SWAT usually operates in urban areas, the only have to walk a couple of yards to their mission point, and most civilians aren’t carrying AK-47s, instead using handguns or shotguns, so SWAT members usually wear some sort of soft armor in conjunction with their hard armor plates. Furthermore, SWAT usually tries to arrest and end the situation peacefully rather than going in guns blazing. They carry handcuffs and tasers, rather than fragmentation grenades and rocket launchers. Their primary objective is to capture, rather than kill, unlike the military. Furthermore, there is a true need for paramilitary forces like SWAT. US military troops do not have any jurisdiction on United States soil, so they are not allowed to do policing operations. Also, SWAT situations are usually time sensitive, with a response needed within an hour, so mobilizing entire troop divisions would be unfeasible. Furthermore, troops trained to fight a war are not trained to deal with hostage situations. They may be able to call in an airstrike, or navigate hostile terrain, but they are not as well trained in close waters combat and negotiations. This may have been most clearly shown during the Moscow theater hostage crisis of 2002. Russian military special forces (Alfa Group) were called in to deal with forty Chechen terrorists who had taken 850 hostages. After three days of unsuccessful negotiations, a sedative gas was pumped in and Russian special forces stormed the building with no casualties. However over a hundred civilians died because of complications with the chemical agent. While some may say that we do not need paramilitary forces to deal with civil arrests, there have been many instances where regular police member are not trained for certain situations, or not well equipped. Think of an active shooter situation. You are a single cop, with a handgun, with little to no body armor, about to take on a psychotic shooter that most likely has a rifle. Or, if police members have to clear an entrenched house, they would not have the training to do so. They would not have the nuances of squad clearing, or explosive breaching.  This is my first blog, so please bear with me with my poor wording. So, you have decided you want to test out your cinematography skills and make an ARMA III machinima/cinematic. You’ve got a basic idea of what you want to create,and you kind of understand the scenes. However, making any sort of highly edited cinematic video is very time consuming, more so if you don’t have the basics down. This guide is meant to help a beginner to making a machinima, and some of the tips I learned while I made mine. First of all, understand what you want to create. Is it a trailer? A montage? Maybe a feature length movie. Whatever you decide to do, this will determine how much time/effort you put into specific parts of making a machinima. For example, if you are just doing a montage, you really don’t have to have any sort of script or plot. For my machinima, I decided to create a movie trailer based on Tom Clancy’s Command Authority. Then, decide how feasible this project may actually be. Any sort of movie project takes a long time, so are you willing to see the project to its end? Do you have the computer to run Arma III at a decent framerate? Do you have a decent video editor? All of these tools are needed to make a “cinematic” Arma III video. Furthermore, begin to plan out your video. Decide on setting and tone first. More importantly, decide what time you want your video to take place in. Arma III’s modding community has a variety of mods to change the near future setting back to WWII, or even further in the future, following the Halo franchise. Also, decide on the tone? Are you looking for a super serious video, or maybe a light hearted montage? If so, would the video benefit from mods like JSRS, Blastcore, or ReShade? These introduce more realistic sound effects, explosions, and lighting respectively. After deciding on a time setting decide on the physical setting. Will the story take place in Afghanistan, or in Eastern Europe? Most likely, the three stock maps, Altis, Stratis, and Tanoa might not fit your setting, so you will have to install mod packs. I decided on the Community Upgrade Project, which ports all of the previous maps from previous Arma games into Arma III, giving you 15 or so maps. Please note that this is a big mod (11gb!). After deciding on the large mods that totally change the game, start deciding on the more minor mods, that may affect your video in smaller, but noticeable ways. Since Command Authority takes place in present time, I had to install mods like Red Hammer Studio’s Russian Armed Forces, and United States Armed Forces. Other assorted mod packs were installed to port more contemporary units into the game. To actually get the shots, I installed a little mod called GCam, which allows for controlling the time of the game, and to get smoother shots with shallower depth of field. Other Assorted Items to get squared away before beginning production. Make sure you have a decent editing program. You simply cannot make a cinematic video without a video editor. There are many great (free) video editors like Black Magic Resolve. After getting the planning squared away, you are ready to begin to spend tens of hours in front of your computer to get this video produced. From scripting out sequences, filming the sequences, and finally editing a product, you will have probably developed carpal tunnel after finishing your video. I will cover most of the down and dirty production steps in the next blog. 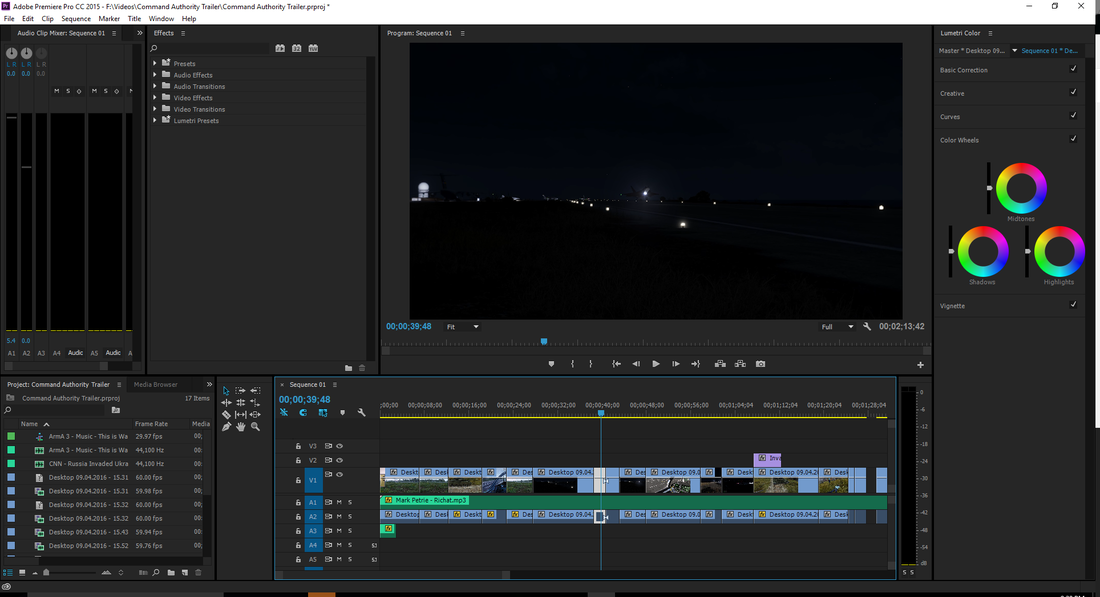 |
AuthorThis is a school project for English 1A for high school. Archives
February 2017
Categories |
 RSS Feed
